The root-dependent section for the PrivMod. Only follow this if you need root access.
Boot to TWRP by whatever means provided to you, whether it's using the provided advanced reboot feature, or by holding down some buttons. Depending on the device, the buttons to press vary. Poco F1, as an example, boots to recovery by holding Power & Volume up.
For now, we're flashing things in TWRP. Order of action : Debloat (optional) (look at sysapps list) > NanoDroid zip(s) (optional) > Magisk > Custom Kernel (optional) > wipe Dalvik (& cache if available) > Reboot to system.
More information regarding this can be found in the System Apps list.
Flash NanoDroid module zip(s) of your choice (microG / F-Droid) in TWRP. Keep in mind that NanoDroid modules can't be flashed on TWRP without rw access.
Don't flash F-Droid and/or microG module if using Lineage-microG, OmniROM microG, CalyxOS (microG via setup wizard, custom F-droid version prebuilt), DivestOS (prebuilt upstream F-Droid, but no support for microG), & /e/ (the last one doesn't have F-Droid) since it's prebuilt.
For Magisk 22.0 & above users with TWRP < 3.5.1 : Don't forget to have another copy of Magisk.apk, & rename it to Magisk.zip.
Flash Magisk zip (or apk if using TWRP >= 3.5.1) in TWRP.
6/6/2023 late update : Starting with 26.0, Magisk drops support for custom recovery installation this guide uses; so use the official installation guide, which will require patching a boot image.
Flash your custom kernel zip.
Custom kernels don't really grant any privacy boons, but might enhance performance and/or battery life. However, some custom kernels may also replace the default DNS with other provider (such as CloudFlare, the most common example), so watch out for that.
Wipe Dalvik (on A-only devices, wipe Dalvik & Cache), & reboot to system. Wiping Dalvik & Cache is important especially after flashing NanoDroid, as not doing so may prevent booting.
Now that we're back in system, our first actions are to install our root apps, starting with terminal, AFWall+, SD Maid, & AdAway. If you have microG installed via NanoDroid, go to the microG section & set-up microG.
You can install them later (after the terminal steps), but installing them at this step allows us to skip installing them in their step.
Open the terminal app & type su. Root access should be granted if requested.
For the captive portal, you have 2 choices: to change the captive portal to a more trustworthy captive portal provider, or to disable them altogether.
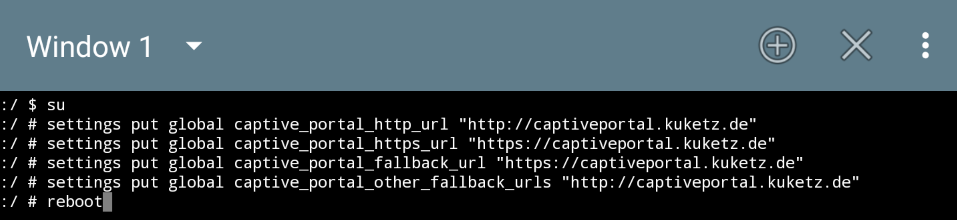
For those who'd like to use captive portal, first read the captive portal provider list for more information. Then, use these commands:
Output example using Mike Kuketz' captive portal provider: (note : the https in the fallback url part can be ignored)
However, if you're confident that you won't use any Wi-Fi / mobile connections with captive portal, or refuse to use external services for internet connectivity checking, here are the commands:
Output example:

If you're already using alternative captive portal & you would like to verify that the setting's applied, here's how :
Gain su in terminal (preferably while changing captive portal provider). Afterwards, you have 2 choices : change the NTP provider to a more trustworthy one, or disable it.
It is recommended to do this before typing in reboot in terminal / powershell, if only to streamline the work done.
In short, here's what we're doing:
If you haven't installed AFWall+ yet, please install it first.
Open the AFWall+ app, & it'll immediately ask for root permission. Grant it. Then, to make it easier to block, select the 3 line menu on the right of the search button, and select "Block selected" option. Then, go to its settings menu by selecting the 3 dot button > Preferences.
In the Preferences section, enter UI preferences, untick "Enable notifications" & tick "Show UID for apps" & "Confirm AFWall+ disable". While these changes aren't essential, they kinda make the interface easier to play with. This UI preferences mods can be skipped.
To prevent data leak on boot, go to Preferences > Experimental and select "Startup directory path for script". Then, choose /data/adb/service.d (or /sbin/.magisk/img/.core/service.d/ if using Magisk < 20.4). Afterwards, tick "Fix startup data leak".
Also, in the Preferences > Rules/connectivity, check that IPv6 support is enabled. If not, enable it.
The PDA will still finely connect to the network, even if this is blocked. While it's technically safe to block all of its connections, doing so will prevent captive portal from functioning (at least that's how it is in Pie). How to mitigate that is discussed in the next section.
If you're using network-based geolocation service, you might not want to block this. However, in my experience (with systemized microG, Mozilla UnifiedNLP, Nominatim), I blocked it & location services still works, though only on Wi-Fi.
Block if not using ADB over wireless connection.
You can block connections for this, but only if you disabled captive portal in the terminal section. Otherwise, follow the next section.
No idea what this does, but I don't experience any errors blocking connections for this one. Found in A10 & A11.
Block all of its connections.
Block all of its connections, if you're not using automatic time adjustments.
You can safely block all of its connection if not using the PDA as a phone. If you plan on doing so, at least leave the mobile data unblocked.
I don't know who prints stuff from their PDA, but, for those who don't, block all of its connections (that is, if it's available & not removed).
Skip this step if captive portal is disabled in the terminal step, or if you don't want to type in the scripts (only for A10 / A11). Again, I will refer to my captive portal provider list for more info in case you're not skipping this.
Tap the 3 dot button, & select Set custom script. Then, depending on your Android version & AFWall version, follow either of these:
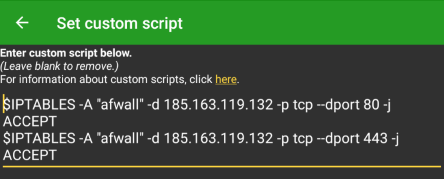
Android 10 & 11; AFWall+ > 3.1.0 (optional & not necessary, just for completion's sake) :
Output example using /e/'s captive portal provider:
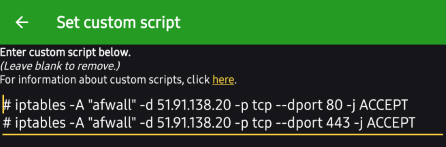
Android 9/Pie; AFWall 3.1.0 only (required) :
Output example using Mike Kuketz' captive portal provider:
Finally, after selecting the apps you'd want to block & enabling the captive portal script (for those who use captive portal), we can finally enable AFWall+ by selecting Save (to save the app rules), then selecting Enable firewall from the 3 dot menu. Now, we wait & see if the iptables rule were applied correctly. If it stops in the middle of applying, you might want to check the custom script for any typos & such.
If you're using AdAway, install it if you haven't. Alternatively, if you have a PrivModded PDA, you could also use its hosts file.
A disclaimer : This phase will require you to rely on someone else's hosts lists. If you're not comfortable with this, replace the hosts sources with your own.
Open the AdAway app. If you're using AdAway 4.3.x; it'll ask for telemetry access on startup, which you can opt out of. Root access will be prompted once you enter Preferences.
If you're using AdAway 5.1.0 & above, it will ask for root / VPN access on the setup wizard. Grant it root access. Then, on the next step, it will attempt to download & apply the default hosts, which will fail if you haven't connected to the internet. This is fine, close & re-open the AdAway app, & you should be on the main user interface.
Either way, in Preferences (in AdAway 5.1.0 & above, Preferences > root-based ad blocker), tick "Enable IPv6"; change the Redirection IPv4 from 127.0.0.1 to 0.0.0.0 & Redirection IPv6 from ::1 to ::. If you're running AdAway >=5.1.0, you can also optionally disable automatic updates in Preferences > Automatic updates & unticking everything there. As for 4.3.x, automatic updates can be disabled by unticking Check for updates in Preferences.
Enter the Hosts sources section in AdAway. By default, AdAway will use these 3:
These hosts are, by default, for blocking ads (StevenBlack Unified also blocks some big corpo telemetry). But, as this is meant to improve our privacy, let's add these hosts :
In order to simplify typing them in the future, create a backup. Open Preferences > Backup / restore block rules, then select Backup & browse to the folder where you want the backup to be. Afterwards, if you'd like to add the hosts above, you can simply use the Restore option, and select the adaway-backup.json. I also have a backup json at my Git releases.
After entering your hosts sources, connect to the internet. Then, return to the Home section in AdAway, and select "enable ad-blocking" (or the download button on Adaway 5.1.0 & above); & wait as the hosts are updated & applied. The more hosts used & the heavier they are, the longer the downloading & parsing will take.
Once completed, you will be prompted to reboot. Now, you can disable the internet again, & reboot to recovery to wipe Dalvik & cache, or just straight up reboot. Either way, this activates the hosts file.
For now, we're done in setting up our device to not trigger unwanted connections (and trigger only the ones that are wanted & necessary).
For the cleanups, head over to the clean-up section of the basic privacy hardening guide.
Back to top