Here's some:
- Mission Impossible: Hardening Android for Security and Privacy
- Mission Improbable: Hardening Android for Security and Privacy
- MicroG on OP6
Get:
- microG-supported custom ROM - discussed in next section
- Magisk
- AFWall+ / NetGuard
- AdAway / Blokada
- SD Maid
- MyAndroidTools
- PlayStore alternatives - Aurora / OG Yalp / Forked Yalp (Forked Yalp may be incompatible with your device)
- F-Droid (Official Link without privileged extension) - Can be skipped if using NanoDroid / LineageOS microG
For those who don't use LineageOS microG, here's what to get (can also be obtained in microG F-Droid repo / its own site):
- microG GmsCore - GitHub / Official link
- microG DroidGuard (optional, for SafetyNet - deprecated for now)
- microG GsfProxy
- FakeStore
However, for those who'd rather flash zips in TWRP, there's Nanodroid.
Refer to my list or XDA's list for which ROM has signature spoofing / microG support. If your ROM lacks signature support, backup your files, and flash one of the ROMs in the list. Adding spoofing support to ROMs that don't support it may pose additional risks, but can be done with tingle / haystack if your ROM is NOT ODEXED. Also, Xposed users can use this. From here on out, do NOT connect to any forms of internet whether it's Wi-Fi, or 3/4/5G.
For additional references, here's my guide.
06/02/2020 additional note: Android 10 ROMs may have issues in mounting /vendor in recovery. Also, A-only partitioned devices running Q will be system-as-root.
Charge your PDA to at least 80%, and keep it plugged in. Then, in system, head to Settings > Security & location > Encryption & credentials. Select Encrypt Phone, and follow the instructions. It's important to do this before flashing Magisk, as MagiskSU may face issues if encryption is done AFTER Magisk is installed. Can be skipped if:
- your PDA encrypts itself by default, whether it's by inbuilt vendor.img, by flashing vendor (or vendor firmware), or, by default (as in some cases, like Google Pixel & Asus 6z)
- the slight performance loss is an absolute hindrance
- your custom recovery has known decryption issues
- your ROM and/or PDA has known encryption issues
- for whatever other imaginable reason you don't want encryption
If you're stuck in the "encrypting device" screen with no clear countdown, as long as you can reboot to recovery, do so. Then, format data, reboot recovery once more - and clean flash your ROM again.
After verifying that the ROM boots and/or encrypted it, reboot to TWRP recovery. Browse to the storage path you put your Magisk zip in, and flash it. Wipe dalvik & cache, and reboot to system. Optionally, a custom kernel can be flashed immediately after Magisk, or in another TWRP reboot.
In addition, NanoDroid modules can be flashed before Magisk.
- 4/11/2019 Update : For Android 9, best config is: Magisk 19.3 & Manager 7.3.5. Manager 7.4.0 & above can have custom app names - but removes default Magisk Manager hiding.
- 6/2/2020 Update : Android 10 users can use Magisk 20.0 & above, but can't edit vendor.
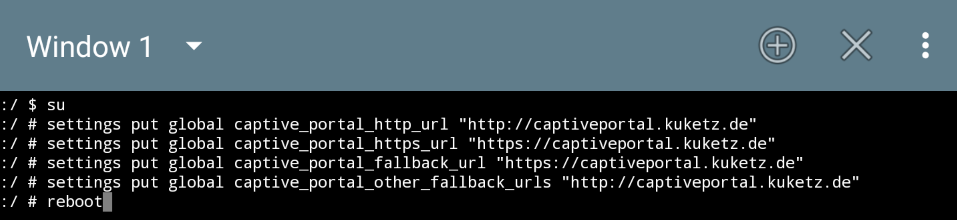
If you're sure that you can live without logging in to Wi-Fi (Android 7 can skip pm disable & captive portal detection):

However, if you can only use login-based Wi-Fi, you may set it to connect elsewhere for connectivity check. Do be noted that if this method is used, blocking Android System in AFWall+ results in no internet access state despite being able to use internet services. However, there's a workaround in the AFWall+ section.
Here's an example for Kuketz' captive portal:
Go to Settings>Network & Internet, and toggle Advanced to gain access to Private DNS. Select it, and select off. Leaving it in Automatic requires you to be absolutely sure that you can trust the random provider. Same goes for the manually enterable "private DNS provider hostname" part, only that instead of random providers, you select your own provider.
Also known as the advanced permission manager. Here's a guide on how to access it:
If App Ops / Privacy Guard is built into the ROM:
- Enter Settings
- Locate where the App Ops / Privacy Guard is placed
If App Ops / Privacy Guard is not built into the ROM (or if it's built-in, but a shortcut's nice to have):
- Download & install AppOpsX (F-Droid) and/or Rikka AppOps (Yalp / Aurora / APKPure). Only difference lies with UI.
- Open the apps, and grant them root access. For AppOpsX, it asks for root as soon as it's opened. On the other hand, for Rikka App Ops, select ROOT mode.
- For the record, both can run without internet access (and, probably should).
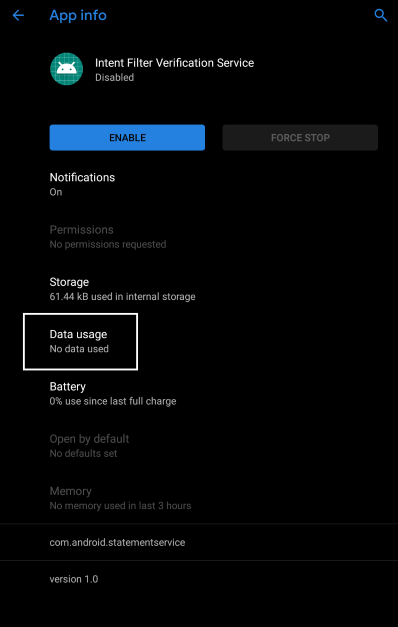
In Settings > Apps > See all apps , find Intent Filter Verification Service and disable it, as it'll trigger questionable connections to "verify" intent. Personally, I'm not too sure about this, but as it lacks a proper documentation - might as well disable it.
While disabling, look at the "Data Usage", to determine whether internet access can be controlled separately from AFWall+.
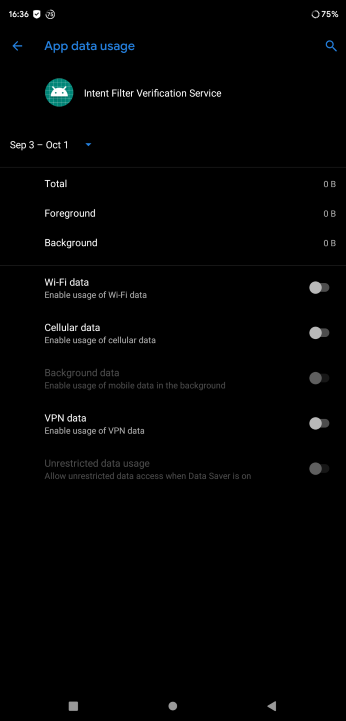
Ideally, it should look like this:
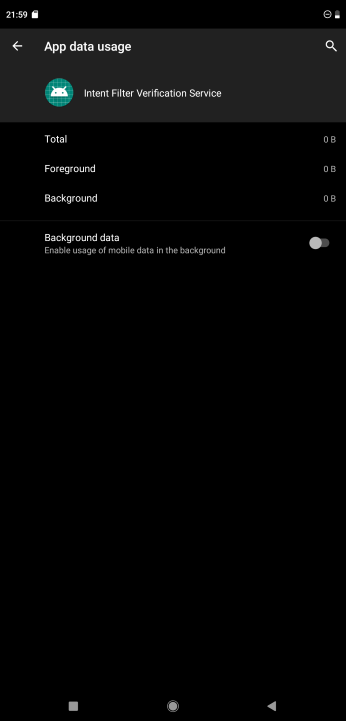
But, in some cases, it'll look like this; which isn't ideal:
For debloating, there are a few methods.
- Freezing / Disabling: Some system-apps can be disabled / frozen in Settings. However, for those that can't be disabled from settings, they can be frozen in SD Maid's AppControl. Ensure that system-apps are visible by going to Settings > AppControl & tick the Include System Apps.
- By TWRP: Reboot to recovery, mount system, and browse to /system/ using the File Manager. Enter either /priv-app/ or /app/. Select a folder, and delete it.
- Titanium Backup: Install Titanium Backup apk in the PDA. Open the app, and install its add-on, which is required. Go to Backup/Restore, select an app / system-app, select the Un-install! option, and select Yes afterwards; and reboot. Personally, I don't find this to be as reliable as the TWRP method; yet it may do the job if you prefer UI-based debloating.
- Root File Browser: Install a root file browser of your choice / SD Maid. Grant root access & storage access (and usage access for SD Maid), enter / system/ app/ or priv-app/ (SD Maid's Explorer); and delete the folder containing the system app that you want to remove.
Regardless, a reference may be necessary. Here's one for the Oneplus 7, and/or one for Oneplus 6. What works for them may / may not work for other PDAs, so take that as you will. Though, for the aforementioned Oneplus PDA owners, the references here are actually debloating scripts for them, flashable in recovery.
Reboot to TWRP (only if you haven't rebooted to system after debloating), browse to the storage path where your Magisk modules are placed in, and flash the NanoDroid modules (if said module haven't been flashed before Magisk), as well as whatever additional modules you're adding. Wipe dalvik & cache, and reboot to system. However, do be noted that using even a single Magisk module (or NanoDroid Module in Magisk mode) will get AdAway to activate its "Enable Systemless Hosts" settings - regardless of the activation of Magisk's own systemless hosts module.
Install SDMaid, and grant its required permissions (root access, storage access, usage access - all done just by getting in settings). Optionally, its telemetry service can be disabled by getting to Settings>General Settings>Bug Reporting & disabling everything there. Preferably installed in the Disable / Debloat phase.
Receiver blocking for apps : Open SD Maid, enter AppControl. Then select an app, and select Receiver Manager. Select the 3 dots button on the top right, and tick the "Other" box. Then, disable the unacceptable receivers. May require some tinkering, as disabling some receivers may cause issues.
Install MyAndroidTools, and grant its required permissions (storage access & root access, usage access optional). Its telemetry can be disabled by selecting the 3 dots on the top-right seection & ticking Close crash report.
- By native settings (primary)
- AFWall+ (primary method for those native settings can't block), always works, assuming there's root access)
- NetGuard (AFWall+ alternative, uses VPN services in place of root)
Can only work if the per-app data controls are as such (remember, as we disable Intent Filter, we're also checking this):
Enter Settings > Apps & Notifications > See all apps, then select an app. Select Data usage, and uncheck whatever data you don't want the app to use. Keep in mind that framework apps (like Settings itself) can't be blocked in this manner.
Install AfWall+ and set which app gets banned from internet access / allowed to use internet. Afterwards, to prevent data leak on boot, go to Preferences, select Experimental, set Startup directory path to /sbin/.magisk/img/.core/service.d/ (the /.core/img one is deprecated), then enable the Fix startup data leak. Also, in the Rules section, ensure that IPv6 support is enabled. Optionally, enable the log service, but set the log to old view, so that we can at least see who tries to connect to what IP. Do be noted that blacklisting UID 1000 (Android System) will result in no internet access status (despite actually having one) if Captive Portal is not disabled previously (a workaround is available below). Finally, enable firewall.
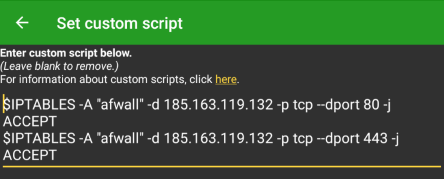
For those who use captive portal login , add this to custom script: (07/04/2020 update : Re-adapted the script to adapt with most recent AFWall+ version.)
# iptables -A "afwall" -d (captive portal provider IP address) -p tcp --dport 80 -j ACCEPT
# iptables -A "afwall" -d (captive portal provider IP address) -p tcp --dport 443 -j ACCEPT
For Kuketz' CP; it should look a little something like:
WARNING : not usable alongside Blokada
Simply install NetGuard (get from F-Droid / GitHub for more feature), select which app gets to connect, and toggle the vpn button (top left, besides the shield logo) to enable the firewall VPN. For those system & framework apps, head to NetGuard's settings - 3 dots on top-right > Settings > Advanced Options, and toggle Manage system apps.
Hosts used:
- https://gitlab.com/Jorgu81/hosts/raw/master/HostsGoogle (Goolag "clients")
- https://raw.githubusercontent.com/StevenBlack/hosts/master/hosts (ad blocking - other known hosts can be used to compliment / replace this one, search the internet for one; however, AdAway has a native hosts for ad-blocking - optional)
- https://raw.githubusercontent.com/StevenBlack/hosts/master/alternates/social/hosts Alternate StevenBlack hosts for those who refuse to use (or be used by) Facebook, Twitter, WhatsApp, Instagram, LinkedIn, Reddit, Tumblr, & Pinterest. Not mentioning G+ & MySpace as it's dead, but it's there too.
- https://raw.githubusercontent.com/CHEF-KOCH/NSABlocklist/master/HOSTS/HOSTS (optional, middle finger to western spies - Big Brother)
Methods:
- Backing up hosts / prepping for manual
- Manual hosts
- AdAway
- Blokada
- NetGuard
Enter SD Maid, & select Explorer. Then, browse to /system/etc, and copy the hosts file there to /storage/emulated/0 - the primary storage. From there, that hosts can also be manually modified via the manual hosts method.
Copy the hosts file to a PC, and copy the hosts entries there. Afterwards, replace default hosts file in the /system/etc, and reboot. May not work if your PC's antivirus is active, as it may trigger a false positive - and wipe the hosts clean.
(1st time) Install AdAway, and connect to internet (finally). Add the hosts mentioned above, enable adblocking (root access request if haven't done so before), and reboot (if hosts file can't be applied, redo clean flash / do manual hosts). Afterwards, to save a few seconds of typing in the hosts, in Hosts Sources / Your lists menu, select the 3-dot settings > Export backup. The file will generate in the internal storage - save it.
(Subsequent PrivMods) Add the hosts sources by: Go to Hosts Sources / Your lists menu, 3-dot settings > Import backup. Allow AdAway to access storage, locate your adaway backup file, & select it. Afterwards, enable adblocking, & reboot (assuming that adblocking sucessfully activates).
Fact : By default, AdAway targets /system/etc hosts file.
WARNING : not usable alongside NetGuard
Install Blokada & enable it by simply by selecting "Touch to resume". By default, Blokada will use Energized Blu, and will bundle several hosts (can be enabled - disabled by default), including StevenBlack (+ porn), AdAway, & a few others. To add your own hosts (or 1 of the hosts we use in AdAway), enter Ad blocking > Host Lists, and select Add a new host list. Then, type out the host list, or inport a host list file.
WARNING : not usable alongside Blokada. Also, requires a GitHub / F-Droid variant of NetGuard.
Follow this guide.
Can be installed as user-app with some compromises (refer to this), or as system-app (can also be done via Nanodroid). Regardless, may be usable even without internet access. I haven't faced any issues doing so, but your mileage may vary.
Can be ignored if using something like LineageOS microG - it's pre-installed. Also, if you can / had no choice but to live with OG Goolag Services privacy issues, it's a skip.
Full details are available at GitHub or the official site. Or, for the more nutshelled version, head to the Keywords section.